Personalized Fields & Merge Tags
Knowledgebase Article
Knowledgebase Article
Create and include personalized fields in your campaigns to more directly and effectively target your audience and keep their attention.
To get started, add a custom field to your contact list:
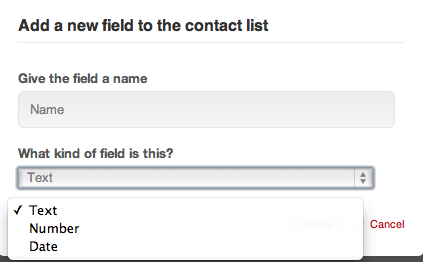
Access the list you wish to use and click on Manage List Structure on the left-hand menu. You will see default fields already available (Contact ID, Email, Sign Up Date) which are created automatically by taking the information entered when a contact is created.* These cannot be removed or edited, as they are used by the system to track subscriber information. To create a new field, click on Add A New Field
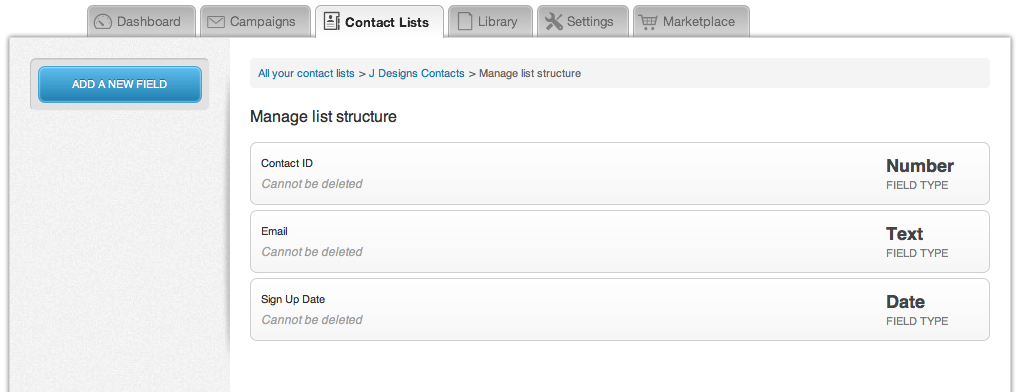
Depending on the field type, you will be able to name and select a field type - Text (Names and other text info) Number (Phone numbers, age, etc.) or Date (Birthday, anniversay, etc.)
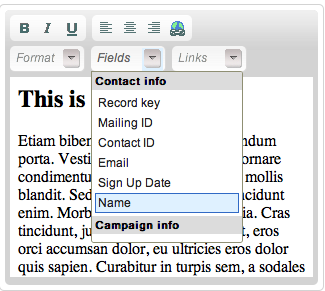
Once your custom field is created, it can be used as personalized content in your campaign.To add personalized fields to your campaign, you can either add them manually or by using the drop-down menu in the editor.
If you are adding the tag manually, keep in mind that the tag needs to match the field name exactly, replacing any spaces in the field name with underscores "_". You can then use this in both your campaign's subject line and the campaign content, customizing the content for each reader:
"Hi[Name]. Here is your weekly update!" would become "Hi John. Here is your weekly update!"
You can also use the[email]tag, which will take the recipient's email address and insert it into the campaign :
"You are receiving this email to the address [email]as requested." would become "You are receiving this email to the address [email protected] as requested."
Using Merge Fields as part of a link -For advanced users
You can use merge fields as part of a custom google analytics link that incorporates user information. This way your marketing department gets highly specific tracking results.
Here's how:
Take your google analytics tracking link, for example:
http://www.mydomain.com/?utm_source=newsletter&utm_medium=email&utm_campaign=septembernews
To track traffic based on company name, you would take the [CLIENTS.COMPANY_NAME] tag and insert it in your link:
http://www.domain.com/?utm_source=[CLIENTS.COMPANY_NAME]&utm_medium=email&utm_campaign=septembernews
When this campaign gets sent, the URL will look like:
http://www.domain.com/?utm_source=MyCompanyName&utm_medium=email&utm_campaign=septembernews
If you want to see site traffic sources by individual email address:
http://www.domain.com/?utm_source=[email]&utm_medium=email&utm_campaign=septembernews
When this campaign gets sent, the URL will look like:
http://www.domain.com/[email protected]&utm_medium=email&utm_campaign=septembernews
This data will show up in your Google Analytics account under "Traffic Sources." To learn how to create custom Google Analytics URLs you can read more here.
Also Available for Advanced Users
Fallback fields Dynamic content
* In addition to creating custom fields, there are also default personalization fields available through the Item drop down menu in the editor. This default information comes from the client details.
Campaign Information
The information for these tags come from the campaign information you will put during the campaign wizard.
The following tags can be used:
[SUBJECT]
"Hello, This email is regarding [SUBJECT]"
Sender Information
The information for these tags come from the details filled out when the list was created. To modify the information, access your list and click on Manage Emails Set Sender Name and Email Address
The following tags can be used:
[SENDER_NAME]
"This email was sent by[SENDER_NAME]"
[SENDER_EMAIL]
"For more information, please email[SENDER_EMAIL]"
Client Information
The information for these tags come from the details filled out when the client was created. To modify the information, hover over the client name in the Client tab and click on Company Info. The following tags can be used:
[CLIENTS.COMPANY_NAME]
[CLIENTS.ADDRESS]
[CLIENTS.CITY]
[CLIENTS.PROVINCE]
[CLIENTS.POSTAL_CODE]
[CLIENTS.COUNTRY]
[CLIENTS.WEBSITE]
[CLIENTS.PHONE]
[CLIENTS.FAX]
These tags can be used as part of your email footer to provide the recipient information of who is emailing them (this is mandatory as part of our Terms of Use):
"This message has been sent from [CLIENTS.COMPANY_NAME],[CLIENTS.ADDRESS]"
which will read as:
"This message has been sent from My Company, 123 Michigan Avenue, Michigan, USA"
List Information
Adds list information to the campaign. To modify, access your list and change the details.
The following tags can be used:
[LISTNAME]
"You are receiving this email as you are part of our[LISTNAME]list"
Actions
These tags allow readers to share your campaign with others, along with the subscribe and unsubscribe options. These tags can be added as part of your email header or footer.
The following tags can be used:
[FORWARD]
Allows your readers to forward the campaign to a friend [SUBSCRIBE]
Allows a reader to subscribe to your list - useful on confirmation emails and forwards
[UNSUBSCRIBE]
Allows a subscriber to unsubscribe from your list
[GLOBAL_UNSUBSCRIBE]
Allows a subscriber to unsubscribe from all lists within the client's account
[SHOWEMAIL]
Used in an email where you want to allow readers to view an HTML version of the email in a browser window. It's often useful for situations where images might not be displayed, or people might receive a text email by default
[SHARE]
Allows the email to be shared by generating a URL - useful for sharing your campaign on websites, such as a blog, Facebook, or Twitter
[CONFIRM_LINK]
Used to confirm opt-in for lists using double opt-in (Cannot be used in regular campaigns)
External Content
These tags can be used to insert or share external content in your campaign.
The following tags can be used:
[INCLUDE=...]
Takes a webpage and inserts it directly in a campaign
[RSS=...]
Allows you share an RSS feed in your campaign
Powered by WHMCompleteSolution